Clearview Towing Mirrors have been specifically designed to fit vehicles used for towing in Australia and provide optimal performance even under the harshest Australian conditions.
Clearview Towing Mirrors operate electrically by plugging into your vehicle’s original electrics.
If your original mirrors feature power-fold, indicators, BSM or heaters then Clearview can provide towing mirrors with these features (only available to specific models).
Indicators can be added into all models that contain electrics at an additional cost. They will need to be taken to an auto electrician to be hard wired into the vehicle. Clearview does not offer a plug for that feature.
If you have cameras in your original factory mirrors then please contact Clearview directly to discuss this option on 03 8351 9933.
Clearview Towing Mirrors are full replacement mirrors.
The electrics on your mirrors will still work from your existing mirror switch the same as your old mirrors did. The top glass in the mirror will operate electrically and is flat glass.
The bottom mirror is convex glass, and manually operated, so you can see into the lane beside you. Removing most blind spots.
When you hook up your caravan, simply pull outwards on the mirror head to slide it out an additional 100mm, allowing you to see down the side of your van.
Upon arriving at your destination, simply unhook your van and then push the mirror back into a standard driving position.
No.
Clearview Mirrors will not fall off or blow back in the event of a road train passing you.
Should you experience any difficulties with your Clearview Mirrors at any time, our friendly technical staff are more than happy to assist in solving your problem.
Clearview Accessories takes great pride in our after-sale product service.
Clearview Mirrors will sit out wider than your current mirrors by approximately 100mm. They are purpose built to get enough slide on the mirror to reach out past the side of your caravan.
Specific measurements are available on model information pages.
Yes.
Clearview Towing Mirrors are legal and all Clearview Mirrors comply with the Australian Design Rules.
Even members of the VIC and NSW Police Force are utilising Clearview Towing Mirrors today!

Yes.
Clearview Mirrors fold back against your vehicle door if hit. They also fold forward if brushed past in a vehicle park.
Clearview carries a full complement of spare parts.
A diagram of the Original Mirror head assembly and the parts required.
Simply remove your current mirrors and bolt our mirror into the same place.
Please review the installation video for your particular vehicle model if you would like more information on the process.
If you are not confident enough to install Clearview Towing Mirrors by yourself, please contact Clearview Accessories directly, or one of our dealers, to arrange a professional installation.
Installation guides are available on our YouTube channel, ‘Clearview Accessories.’ If you are unsure about installing your Clearview Product,
No.
Clearview Mirrors are designed to be vehicle specific. So they will not fit other model cars.
However, Clearview is always adding to their available vehicle model range.
If you have a vehicle that Clearview does not currently make their towing mirrors for, and you would like our mirrors on your vehicle – PLEASE LET US KNOW.
If the demand is there for a particular vehicle, we’ll add it to our product range – simple as that!
Yes!
It’s easy to remove Clearview Mirrors and refit your old mirrors at any time without any problems at all.
For a small charge, any mechanical workshop or auto electrician should be able to fit Clearview Mirrors for you.
Depending on the complexity of the installation, a dealer should be able to install the mirrors in approximately 15 minutes per side of the vehicle. Installation requiring special fitting and/or hard wiring will require longer fitting times (eg: Camera and electric wiring kits). Note: The 70 Series mirrors with electrics are more complex and will take more time than a ‘normal’ vehicle fitting. Please contact Clearview mirrors if you have any questions about fitting or wiring.
Yes.
Clearview has mirrors that come with a manual actuator. And can be manually operated to adjust the mirror position. Clearview also offers this for GU Patrol utes that do not have electrics.
Not at all.
The electrical connectors that come with Clearview Mirrors are designed to fit directly into your existing wiring loom. There are no wires to cut. Just unplug your current wiring connector and plug Clearview’s back in. The operation of your mirror will work as normal.
Original Clearview mirrors come in either a chrome or a textured black finish.
When purchasing Clearview Mirrors with indicators:
When purchasing Original Clearview Mirrors without indicators, either electric or manual:
Yes. Chrome mirrors are more expensive.
The Clearview Towing Mirrors warranty is 12 months from the date of purchase. To extend this warranty a further 24 months for a total 36 months, the warranty card provided with your purchase must be completed and returned to Clearview with a copy of your dated proof of purchase within 14 days of date of purchase. Click Here for full terms and conditions.
If you are not happy with Clearview Mirrors, they offer a 100% money back guarantee on the product if returned within 7 days and in the original box.
If you already have that function in your vehicle, then the Powerfold will pick up this function when it is installed. However, if you don’t have that function in your vehicle, then the Powerfold won’t automatically fold in and out.
The auto folding capability is usually programmed into the vehicle itself.
No, we currently don’t have anything that we can supply.
The Powerfold mirrors can fold manually, however the manual fold mechanism is only designed as a safety feature. Through the lifespan of the product, manual folding will occur, such as people walking into them or accidentally bumping them. The internal mechanisms are designed to withstand this accidental manual folding during normal usage. It is not recommended for the mirrors to be manually folded constantly, as it will prematurely wear out the internal folding mechanisms and reduce the lifespan of the product.
No, the extending and retracting of the mirror still needs to be done manually.
If your vehicle already had powerfolding function in the original mirrors, then the Clearview Powerfold Mirrors will be a plug and play product and operated using your original controls.
If your vehicle didn’t have powerfolding function in the original mirrors, then you will need to purchase the suitable Powerfold wiring kit and have an auto electrician to conduct the work.
Some vehicles have no provision for Powerfold switch (either all provisions already used or no provision at all) may require cutting of the dash to fit switch in, or fascia panel for switch mounting may need to be purchased from other retailers.
After the mirrors are installed, they need to be cycled a few times. This will allow all the internal mechanisms to set and find the proper positions. If the mirror head is still loose/floppy after they’re cycled, please contact tech support.
Press the powerfold switch once, this should initiate the powerfolding motors and the mirrors should start folding inwards. Wait until the mirrors are fully folded in and stopped moving, then press powerfold switch again. This should now bring your mirrors back out to normal driving position, check and see if the mirrors are locked into position firmly. If mirror is not returning to the normal position, please contact tech support.
In most vehicles, the mirror housings are angled differently between the driver and passenger side. This is because when you sit in the car, you are off center, so generally the passenger side mirrors are closer to the vehicle body to allow you to have the same field of vision in the mirror. So it is completely normal.
Generally the passenger mirror will fold/unfold quicker, as it is closer to the vehicle body and therefore travels a shorter distance compared to the driver side mirror. See previous question in regard to why the mirrors are angled differently.
Under normal powerfold operation, there shouldn’t be any maintenance required. However, if it is used for off-road very often, then the mirrors may need to be maintained every 12 or 18 months. This would involve pulling the mirrors down and assessing components such as the slip disc and cradle for wear and damage, and possibly re-grease the two components.
General maintenance such as greasing the arm with silicone spray is the same as normal manual fold mirrors.
Apart from the mirror head itself, everything else on the Powerfold is different.
When the Powerfold mirror is being cycled to find its original driving position, it will “jump” back into position and make an audible click sound when mechanisms realign. Once the mirror has found the original position and have been cycled, check for looseness and mirror movement. If they feel firm then the mirrors have not been damaged. If they still feel loose, please contact tech support.
The circuit breaker inside the mirror activates when the electrical current increases due to resistance. If the mirror stops before it reaches the folded in/out position, that means something is adding resistance while the mirrors are folding, hence activating the circuit breaker before it has reached the desired position. Please contact tech support.
Yes! Depending on the complexity of the installation, Clearview mirrors are extremely easy to install and mount to the vehicle’s original OEM mirror mounts. Depending on the vehicle’s current mirror options, Clearview mirrors include plug and play wiring looms. Instructional videos are also available on our website (clearviewaccessories.com.au) in the “HOW TO” section. Clearview recommends that any installation requiring hard wiring be done by a licensed auto electrician.
No. The telescopic arms are extended manually. Clearview Mirrors will only fold against the vehicle electronically provided we make that model in Power Fold.
No. The cost of converting the mirrors to suit the new models is not worth it. We recommend either selling your Original mirrors privately or through the “Pre-Loved” section (Within the “Shop” menu category) of our website and purchasing the new Next Gen or Compact mirrors brand new.
Yes, you can. But it comes at a greater expense than if you were to order the mirrors with indicators. Installation to the mirror head will require longer time and more parts to dismantle
Yes. We have a list of spare parts for all our mirrors on our website. Our dealers also have a list of all our spare parts.. If you cannot find the parts that you require, please contact us or any of our dealers to assist you with your inquiry
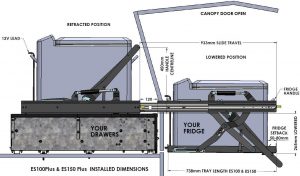
The “Standard” ES-100 slides out the length of base with left runner locking and is ideal for installing in wagons like 100, & 200 series, Patrol, Prado, etc..

The “Plus” Easy Slide was developed for installing in a ute canopy with angled sides. To provide clearance for the handle, the Easy Slide must be mounted back on the drawers. So Clearview has made the Plus version with extended travel runners that slide out an extra 120mm and both sides lock out.
Any one of the mounting styles shown below are acceptable as long as you have one bolt in each corner.

2. Two hole mounting plate
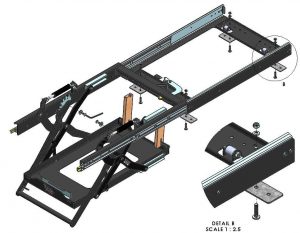
3. New style single hole mounting plate

Clearview recommends running the 12 volt lead up through the handle.
The Easy Slide tray sits 25mm above your drawers. Once extended, the tray travels down 290mm (25mm +265mm). It ends up 265mm lower than the top of the drawer (or the bottom of the Easy Slide).

For those with short drawers, there are 5 positions on the locking/lowering mechanism. Which allows for 5 different lowering levels. With the lowest being 265mm from the top of the drawers. The second lowest is 175mm from the top of the drawers and works equally as well as any other of the five levels, including the lowest.

Lowest level: 290mm drop

2nd lowest level: 200mm drop
The ES150+ is 70mm wider (tray width and overall width) than the ES100+. Everything else is identical. Refer to EasySlide Dimension sheet on website found here
The difference is the plus model have an extra 120mm in rail travel distance. Original ES100 & ES150 rails were 813mm long, with a rail travel of 813mm. The ES100+ & ES150+ have rails that are 813mm long, with rail travel of 933mm. ES220+ have rails that are 965mm long, with rail travel of 1085mm.
As of January 2018, there are no more original models dispatched from Clearview.
The original models (ES100 & ES150) were first developed to fit on top of drawers in the back of vehicle boot, to bring the fridges back down to the boot floor height. With increasing number of vehicles fitted with canopies and slides being fitted into canopies, the plus models were developed.
Due to typical canopy designs, usually with outer coping rails and angled side opening designs, slides often had to be set back away from the edge of the canopy, which led to the tray assembly of the slide not travel far enough to allow for the drop-down function. The extension of rail travel distance solved this issue.
Plus model rails can be purchased at $120AUD (correct as of 04/10/18) to convert the original model to plus model. ES100+ & ES150+ uses identical length rails.
Originally rails were single locked on the right hand side. Due to the free movement in the left hand side rail, when slide is fully extended and lowered, the entire tray assembly can twist towards the left hand side when force is applied. This became a potential risk for causing damage to the side of the vehicle. The double locked rails was introduced to eliminate this risk.

Locks on the rail can be disengaged with a small reversible modification, which require the use of a shifter. This modification will disengage the lock in function only, rail will still have the lock out function. Apply this modification to the side you wish to disengage the lock. Do not apply this modification to both sides.

In most cases, fridge dimensions provided by fridge manufacturers will be the overall dimension, where it includes handles and lock latches. The footprint size (length and width at the base) of the fridge are usually smaller, this is a better dimension to use in determining slide suitability. EasySlide Size Flow Chart should be used to determine which slide is the most suitable. However, there are factors in certain cases that will affect the selection of the slide. Below are some possible cases.
Scenario 1. Fridge handles are same height as EasySlide handle.
There are many different fridge handle styles on the market, some protrudes more than others, some are designed to be recessed into the fridge body. There are situations where based on footprint size, fridge should fit into slide, however, handle protrusion prevents fitments. See below for an example.
Both fridges are identical in overall and footprint dimensions, only difference is the height of the handle. Top example shows the fridge handle located approximately same height as the EasySlide handle, which will end up interfering. Meanwhile the lower example shows the same handle located below the EasySlide handle, which will not interfere with anything and allows the fridge to fit into the slide properly.

The EasySlide will elevate your fridge by 28mm.
The safety lowering mechanism allows 5 different lowering levels, the lowest being 262mm below the mounting surface. So the total travel is 290mm (262mm + 28mm). The next lowest is 172 below the mounting surface, total travel 200mm (172mm + 28mm).
The slide can be set back up to 150mm away from the outmost point of the canopy/tray/drawers. Although the back of the tray is 170mm away from the front edge of the slide base, we don’t recommend the set back distance to be greater than 150mm.

Step 1. Determine the overall height of the EasySlide you wish to install. ES100+ & ES150+ have overall height of 470mm, ES220+ have an overall height of 525mm.

Step 2. Mark out the overall height of EasySlide on the canopy profile, measure the corresponding horizontal distance to the out most point of your canopy. This distance is your minimum set back distance required*.
*There are a few factors that will affect this set back distance, such as

Step 3. Check the set back distance from “Step 2”, making sure it is below the maximum set back distance of 150mm.
All EasySlide will come with one strap bracket. The ES150+ have a provision for a second strap bracket, which can be purchased separately.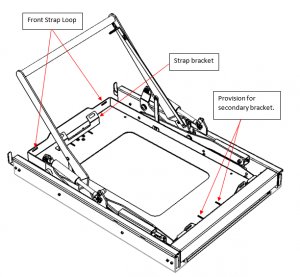
If necessary, the strap bracket can be removed or moved by loosening the 2 bolts holding it. If the bracket is removed, the fridge can be strapped through the loop holes on the front edge of the tray.
In this case, the straps at the rear of the fridge will need to be turned around, so strap buckless are facing inwards. This can be found on http://www.clearviewmirrors.com.au/pdf/ESlideInstructUserGuide18.pdf , last paragraph of page 5.
ARB Element Fridge fit into the ES220+. However, due to the recessed design of the fridge handle, the fridge cannot be strapped down like other fridges. In order to secure the fridge into the slide, customer will need acquire the “Element Fridge Tie Down Kit”, which will then allow the fridge to be strapped as per usual.
Alternatively, the fridge comes with tamperproof bolts, which can be used to mount the fridge if customer wish to drill holes in the tray of the ES220+.
No we don’t. Please check with RV Storage Solutions, as they make them for the ES100+.
Yes, the EasySlide can be fitted over Titan drawers. However, there are a few factors to consider when fitting the slide on Titan drawers, see below
– Titan drawers have a lower height than some other drawers on the market. The height measurements on the Titan drawers is between 240-270mm, depending on model. This may prevent the EasySlide to lower fully, as reported by some customers.
– The lashing rings/strap rings on top of titan drawers may need to be removed prior to fitting EasySlide. The rings protrude from the drawer top surface, when EasySlide is bolted over the top, it causes the slide to distort and affects the operation of the slide.
– The EasySlide should not be bolted over the aluminium trim found on the Titan drawers. This is because the aluminium trim is higher than the drawer top, and when slide is bolted over this trim, it causes the edge of the slide to roll inwards and reduces some of the clearance gaps within the slide. In most cases, this leads to slide components interfering with each other.
– Titan drawers usually have one fixed top platform and built-in sliding top platform. Many people have asked if the EasySlide can be mounted on top of the sliding platform to allow more extension. This can be done, but it is not usually recommended, as the load created from the operation of the EasySlide may damage the drawers.
This is a common questions for people who wish to mount the EasySlide directly into the boot of the vehicle without any drawers. The EasySlide was designed to lower fridges back to the boot floor height when mounted on top of drawers. It will not extend far enough to allow the fridge to be dropped beyond rear bumpers or tail gates.
If the slide does not lower fully and lock into position, it will need to be locked into the second lowest position. It will not just rest on the floor or tailgate.
The EasySlide lowers in a straight, vertical action, utilizing scissor arms.
Each EasySlide is supplied with 4 mounting plates with M8 x 32mm thread. This is passed through the drawer top and slide is secured to it with M8 nuts (supplied). This is the recommended way.
In most cases, when the cog mechanism is not working as it should, it’s something with the way the handles are installed. Often when the handle has not been placed over the locating point properly, so the pawl and cog are misaligned (See image below).
Please ask customer to send images of the misaligned cog and image of the bolt securing the handle and forward onto tech support for assessment.


Yes the CFX75 fits into the ES220, the insulation bag will fit over as well. However, any side pockets on the bag may become unusable, due to obstruction from the Easy Slide handle.
Yes, provided that they can be secured properly, are of suitable dimension and weight for the Easy Slide.
Please ask if the EasySlide is loaded or empty. If empty, it is normal for the lowering to be difficult, as you are working against two gas struts. When the slide is loaded with a fridge, the weight of the fridge will counter the gas struts, making lift and lowering of the slide much easier.
If the slide is loaded and still very difficult to operate, please pass onto tech support.
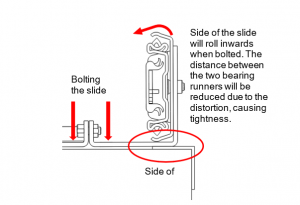
The most common cause of this is due to the mounting arrangement of the slide. Most drawers have a carpeted top surface and aluminium trims around the edge. If any side of the EasySlide is sitting on the trim, when the slide is bolted, it will distort. On some drawers, the carpet and edge trim sits flush and they seem to offer the same surface height, however, carpet will compress when slide is bolted over the top and the trim will not compress, so this will still cause distortion issues.
Please ask customer to loosen the mounting bolts and then test the slide to see if the situation has improved. If it has, then the the mounting arrangement is the cause of the issue. This means they will have to make sure the slide is not sitting on the trim, or to pack the slide up so it is sitting at the same level as the trim.

If problem still persists, please request some photos of the setup and forward to tech support.
For the travel lock bearing to interfere with the base plate of the EasySlide, the distance between the two would have been reduced. This could happen due to the following:
1. If the front of the EasySlide is sitting on the trim of the drawers, then when it is bolted down, the front of the EasySlide will roll inwards, reducing the distance between the front lip and travel lock bearing. The slide will need to be moved off the trim or it will need to be packed up so when it is bolted, the rest of the slide is sitting at the same level as the trim.
2. If the fridge is strapped down too tightly on the EasySlide tray assembly, it will cause the tray to distort, where edge of the tray will roll upwards, creating a bow. The middle of the tray will usually dip down as a result, causing the travel lock bearing to sit lower than it should, leading to interference.
3. Some drawers have lashing rings or buckles on the top surface, if the EasySlide is mounted over these rings, it will cause the slide to distort, which could cause the interference issue.
Please request photos of the setup and forward to tech support if problem still persists.
Not much maintenance is required for the EasySlide apart from keeping debris out of moving parts, such as bearing runners and lock levers. If customer wish to clean the bearing runners, degreaser can be used to clean the bearing runners and marine grade grease should be reapplied to the bearings afterwards.
The Power Boards obtain door opening and closing signal from the vehicle, which is sent to a controller unit. The unit then sends a signal to the motors, which then opens and retracts the side boards.
The Power Boards obtains door signal in several ways, depending on vehicle model. It can obtain signal from:
Please refer to Power Boards model list to see where the boards obtain signal from in specific vehicles.
The Power Boards comes with suitable plugs for the vehicle, so no wires need to be cut.
No, the Power Boards are designed to be vehicle specific. The brackets are designed to suit the underbody shape of individual vehicles, modifying them will affect the fitment and geometry of the brackets. Controller units are also vehicle specific, so they will not work if plugged into an incorrect vehicle.
The Power Boards mounts to the cabin underbody. Usually around the inner surface of the vehicle cabin underbody. It does not mount to the chassis rail directly like many other side steps.
The Power Boards are not designed to be used as rock sliders. As this may damage the brackets/motors/boards and cause them to malfunction. The brackets and motors will also become catch points if they’re used as rock sliders.
No, any existing side steps will need to be removed in order to fit the Power Boards.
Power Boards that obtains signal from vehicle OBD-II port will come with a harness that has a piggyback plug, so when the Power Board is connected into the OBD-II port, there will still be a free OBD-II connector for ScanGauge or other equipment.
Allow approximately 3 hours. However, this time estimate will be skill dependent.
We recommend installation to be completed by professionals, as there is electrical wiring involved, as well as removal of vehicle trims. However, if the individual is hands on and have experience working on cars, then they’re most likely be capable of performing the installation themselves.
The boards when in deployed position will be between 280-330mm, depending on vehicle.
When measured from Cabin opening to surface of the Power Board:
200 Series – 330mm
D-Max, M-UX, Colorado – 280mm


Depending on vehicle model, the step can have a depth of between 115-135mm.
The motors are IP68 rated, meaning they are dust proof and safe for complete water immersion.
The boards are equipped with a safety cut-off feature, where if there are anything that prevents the boards from fully deploying, they will stop. To reset, open and close the door again. Some customers have installed a kill switch into the Power Board system for off roading, which disables the Power Boards completely until they’re required again.
When the boards are deployed, place foot on the step and apply downward force while closing the door. This will trigger the safety cut-off function on motors and keep the boards in a deployed position. To retract Power Boards, simply open and close the door again.
The boards are rated to 300kg each side.
There could be several things:
If it’s not in the above list, please forward to tech support.
There are three different ranger models, PX1, PX2, PX3.
Check the following:
If all the above are correct,
Please check
There are several reasons why the boards are not leveled. Check to ensure all brackets are installed properly and no bolts or screws are crooked or cross threaded.
From vehicle to vehicle, bracket to bracket, mounting holes will have slight discrepancies, so Power Board packages contains U shaped packing washers to help level out the boards. Please refer to instruction on how to use these.
Please deploy the Power Boards and check if there are any debris (rocks and stones) stuck in the brackets. Debris in the brackets can sometimes prevent the boards from retracting all the way in, as they will set off the safety cutoff feature in the motors. Any mud build up should also be cleaned off the brackets.
AAccording to Mazda dealer, the BT-50 Extra Cab/Freestyle Cab/Space Cab only have provision for two Power Board brackets per side. Our BT-50 Power Boards requires three brackets per side, so it will not fit as intended.
So far, all the 78 Series Troopy we have seen have the exhaust system running down the passenger side of the vehicle. The space between the exhaust and cabin isn’t big enough to fit the Power Boards brackets. So Power Boards can’t be fitted.
The micro switch they’re referring to may look like the image below. It is not a kill switch; it is designed for reprogramming of the ECU controller to suit a left hand drive vehicle. It should not be included in the product, however, some of these switches may have been accidentally placed into the product package. This switch should not be pressed.
If the customer has pressed this switch and reporting the boards are not working properly, they can reset the ECU controller by press and holding down the switch for 10 seconds. This will revert ECU back to default right hand drive configuration.

